Manage rules and policies
The Policies page displays the rules that Semgrep Code uses when scanning all of your repositories.
Modifications to the rules on the Policies page allow you to increase the breadth and depth of your scan coverage or remove noise from scans. You can also determine whether findings detected by a given rule can help block merges for pull requests (PRs) or merge requests (MRs).
Language coverage and scan speeds
Semgrep Code identifies the languages used in your repositories and only runs rules applicable to those languages. For example, adding Ruby and Python rules in your Policies doesn't affect the scan speed for Python-only repositories. Only Python rules are run for Python repositories.
Policies page structure
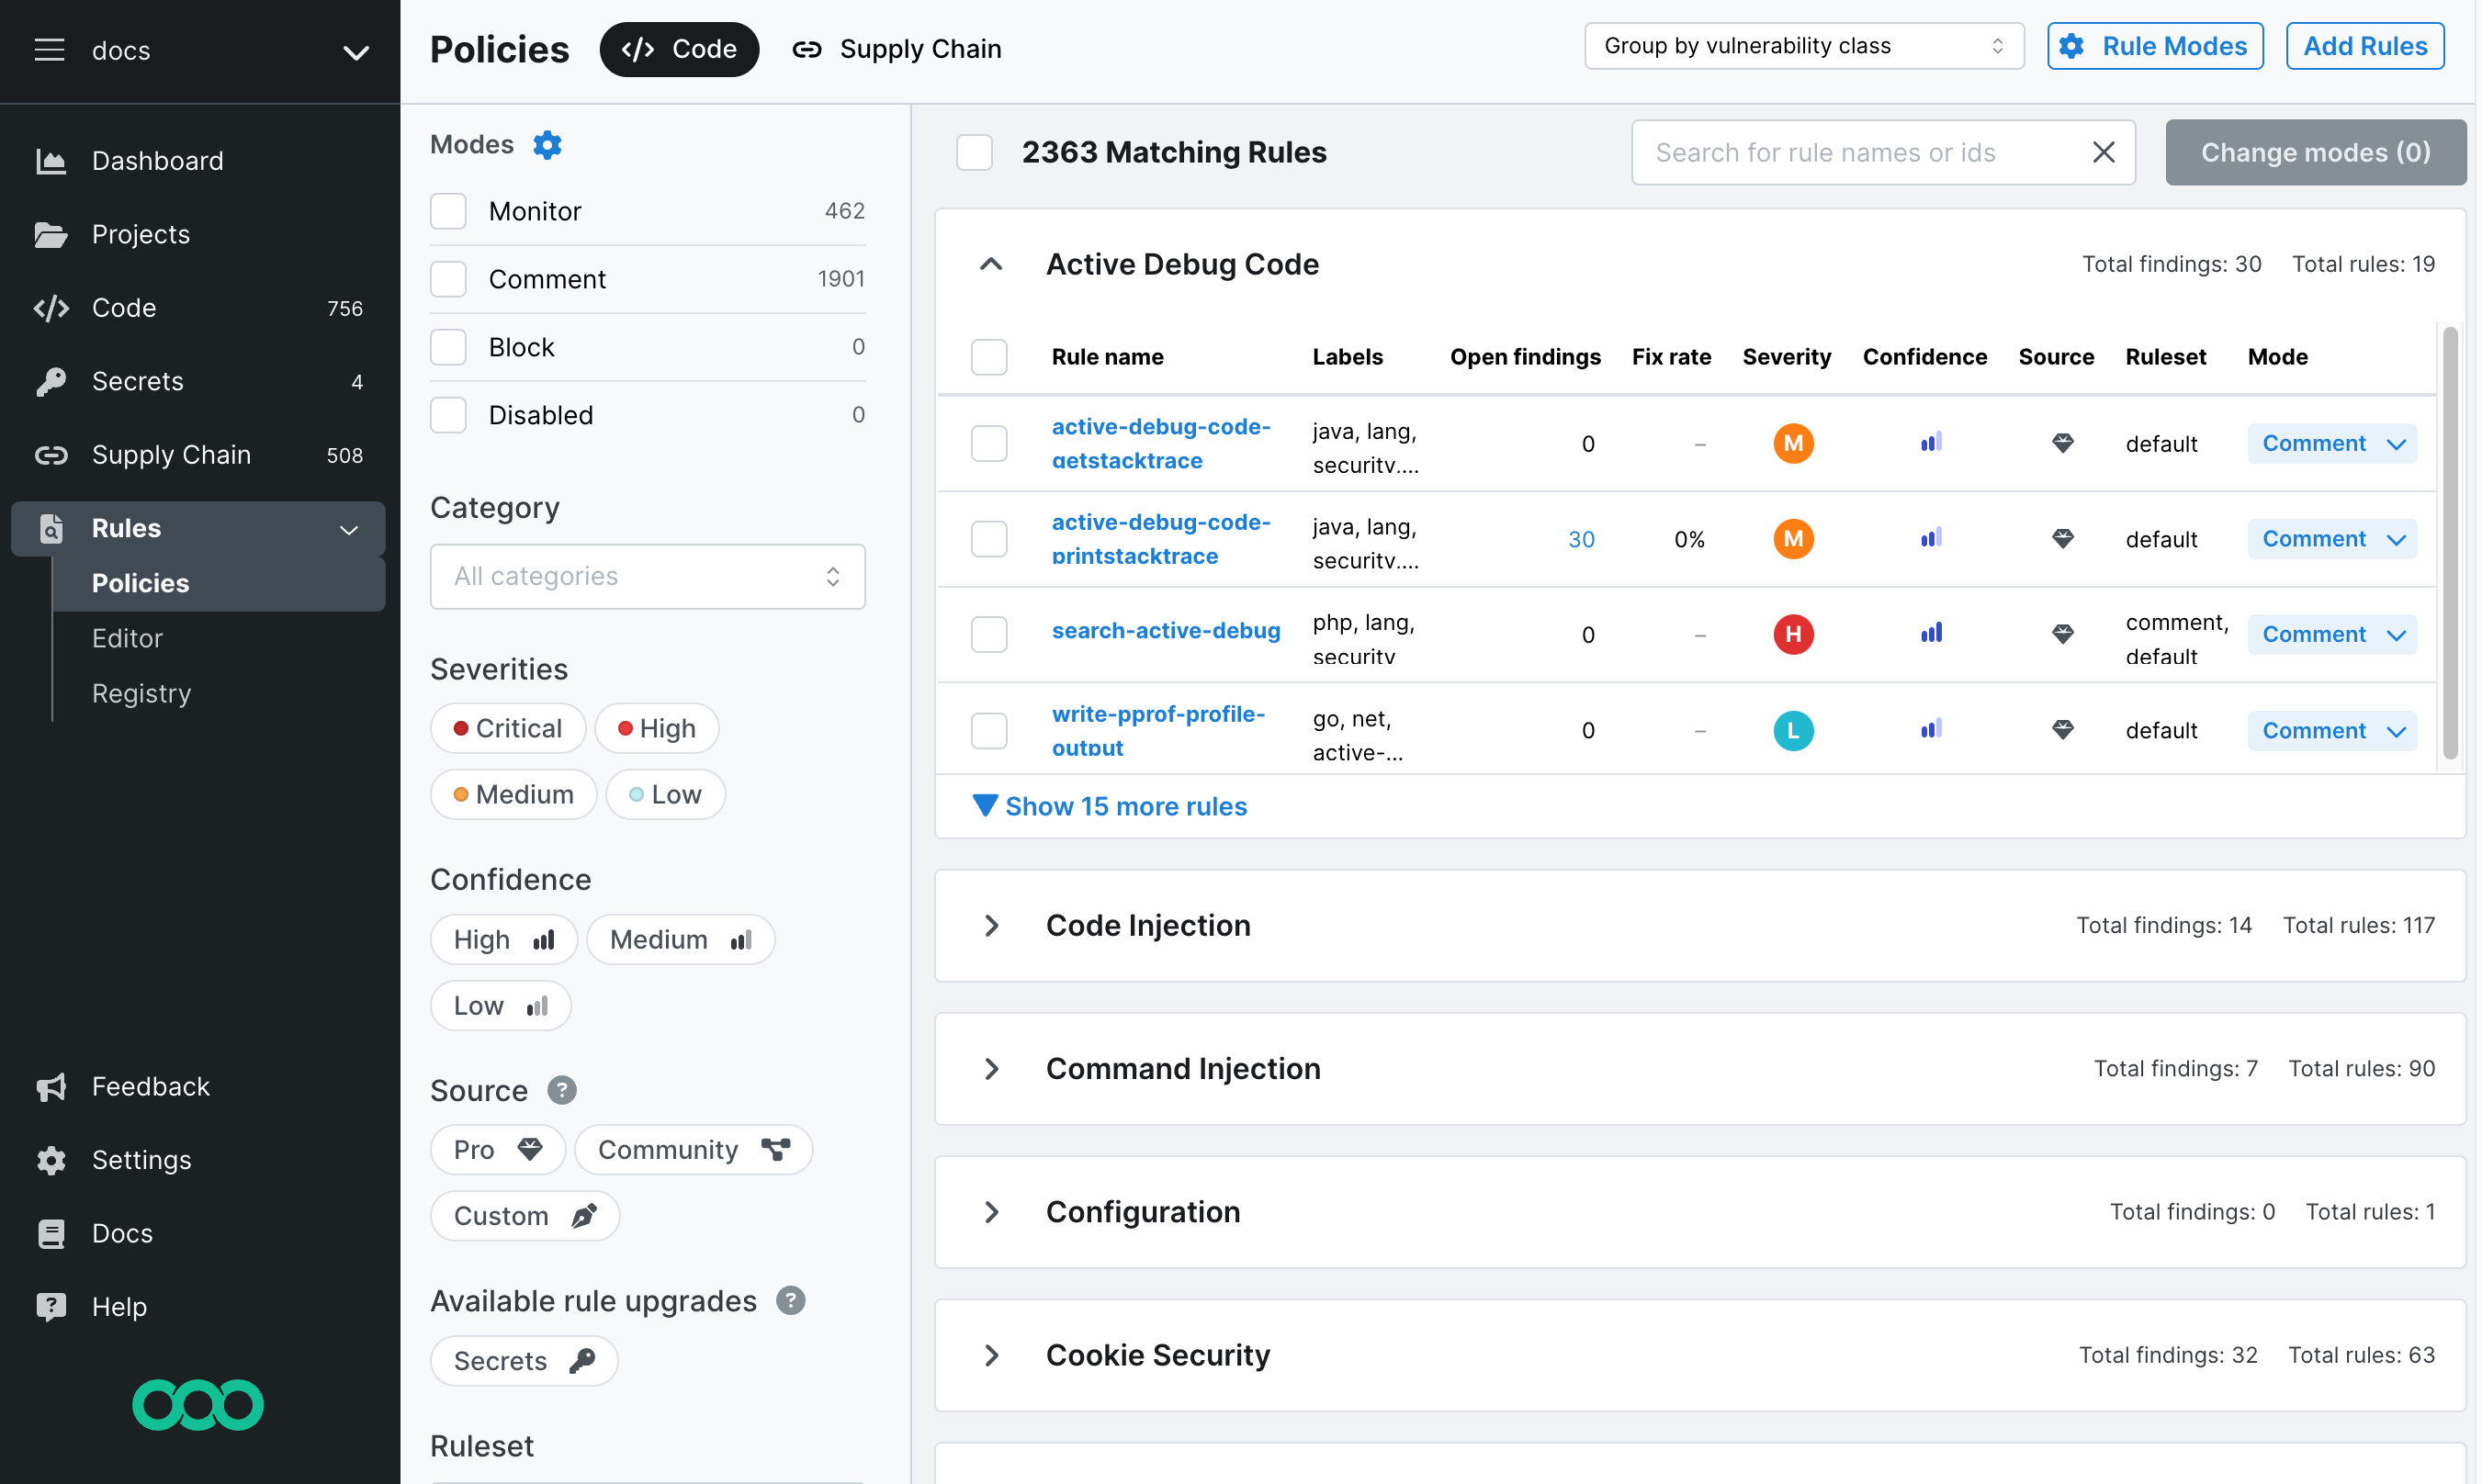 Figure. Default view of the Policies page, known as the Group by vulnerability class view.
The Policies page consists of a header and three main panes:
- Policies header
- The top header consists of:
- Policies view drop-down, which lets you choose between:
- Grouping rules by vulnerability class
- No grouping
- Rule Modes button where you can view rule modes and edit notifications for each rule mode. Rule modes define what workflow actions Semgrep Code performs when a rule detects a finding. For example, setting a rule's mode to Comment means that Semgrep posts PR or MR comments from findings generated by that rule. See Block a PR or MR through rule modes for more information.
- Add rules button that takes you to the Semgrep Registry where you can add rules to the Policies page and assign their initial modes.
- Policies view drop-down, which lets you choose between:
- Filter pane
- Displays filters to quickly select and perform operations on rules in bulk. See Policies filter reference for more information.
- Rule pane
- The rule pane displays the rules that Semgrep scans use to detect findings and allows you to edit their assigned rule modes. You can make these edits either one by one or through bulk editing of many rules. You can also use the Search for rule names or ids box. See Policies filter reference for more information.
Policies page filters
This section defines the Policies page filters:
| Filter | Description | Examples or possible values |
|---|---|---|
| Modes | Filter by the workflow action Semgrep performs when a rule detects a finding. An additional filter, Disabled, is provided for rules that you have turned off and are no longer included for scanning. | See Rule modes documentation. |
| Category | Filter by the type of security issue or vulnerability that the rule detects. |
|
| Severities | The higher the severity, the more critical the issues that a rule detects. |
|
| Confidence | Filter by the confidence of the rule to detect true positives. |
|
| Source | Filter by the origin of a rule. |
|
| Available rule upgrades | Filter for rules where there exist improved versions to those using paid Semgrep products. | |
| Ruleset | Filter by the name of an existing ruleset. | |
| Language | Filter by programming language |
|
| Minimum count of findings | Filter by the number of findings. |
|
Use Minimum count of findings to identify rules generating a lot of findings. This may be an indication of false positives or noise.
Rule entries reference
This section defines the columns of the rule entries in the Policies page:
| Filter | Description | Examples or possible values |
|---|---|---|
| Rule name | Name of the rule that Semgrep Code uses for scanning. | docs-print-to-logger |
| Labels | Metadata describing the rule. This includes the rule's language, category (good security practices, coding standards), and more. |
|
| Open findings | The number of open findings that the rule has detected across all scans. | n/a |
| Fix rate | The percentage of findings that are fixed through changes to the code. | n/a |
| Severity | The higher the severity, the more critical the issues that a rule detects. |
|
| Confidence | Indicates confidence of the rule to detect true positives. |
|
| Source | Indicates the origin of a rule. |
|
| Ruleset | Rules are also organized in rulesets. Rulesets are groups of rules related through a programming language, OWASP category, or framework. | |
| Mode | Specifies what workflow action Semgrep performs when a rule detects a finding. An additional filter, Disabled, is provided for rules that you have turned off and are no longer included for scanning. | See Rule modes documentation. |
Add rules
To add rules, follow these steps:
- On the Policies page, click Add Rules.
- You are redirected to the Semgrep Registry page. Explore the page, open cards of individual rules, and then click Add to Policy.
- Specify the workflow action of the rule that you are adding. Select either:
- Monitor
- Comment
- Block
Add custom rules to your Policies
To add custom rules, use the Semgrep Editor. See Setting code standards with the Policies page.
If you have Semgrep Assistant enabled for your organization, Assistant can help you write custom rules to find patterns and vulnerabilities specific to your codebase.
Add rulesets to your Policies from the Registry
Instead of adding individual rules to your Policies, you can add rulesets, which are groups of rules related through a programming language, OWASP category, or framework. The Semgrep team curates the rulesets.
- On the Policies page, click Add Rules.
- You are redirected to the Semgrep Registry page. Explore the page to find the ruleset you're interested in adding.
- Click the ruleset to open its Explore page. This page lets you view the included rules and provides instructions for testing and running the ruleset locally before adding it to your policies.
- Click Add to Policy.
- Specify the workflow action for the rules that you are adding by selecting one of these options:
- Monitor
- Comment
- Block
If Semgrep adds rules to the ruleset in the future, they will automatically be added to your Policies in the same mode that you select. You can change the default mode for the current and future rules by re-adding the ruleset through the Registry and choosing a different mode. You cannot change the mode of all existing rules associated with the ruleset using the Policies page, since this only makes every rule that you changed an exception to the default.
Filtering behavior
- Filter types such as Language and Technology use
ANDlogic. This means that search terms must match all filters. For example, selecting Java (a Language) and security (a Category) shows only rules with both properties (Java and security). - Adding filters of the same type use
ORlogic. This means that search terms can match any of the filters for that type. For example, selecting Java and Python (both Languages) shows rules with either language. - A gem icon (💎) denotes Semgrep Pro rules.
Disable rules
See Triage and remediate findings for information on how to disable a rule or a ruleset.
Rule modes
Semgrep enables you to choose a workflow action based on the presence of a finding. Workflow actions include:
- Failing a CI job. Semgrep returns exit code
1, and you can use this result to set up additional checks to enforce a block in your CI/CD pipeline. This action applies to both full scans and diff-aware scans. - Leaving a PR or MR comment.
- Notifying select channels, such as private Slack channels or webhooks.
Semgrep Code provides three rule modes:
| Rule mode | Description |
|---|---|
| Monitor | Rules in Monitor mode display findings only in:
|
| Comment | Rules in Comment mode display findings in:
|
| Block | Rules in Block mode cause the scan job to fail with an exit code of 1 if Semgrep Secrets detects a finding from these rules. You can use this result to enforce a block on the PR or MR. For example, GitHub users can enable branch protection and set the PR to fail if the Semgrep step fails. These rules display findings in:
|
Semgrep Code provides first-time users with the Default ruleset. These rules are initially placed in the Monitor column. As you develop confidence in these rules, you are able to change their modes to Comment or Block, ensuring that developers remain free of friction from false positives.
Block a PR or MR through rule modes
The following instructions walk you through changing the rule mode for rules that generate high severity findings to block. Whenever Semgrep identifies such findings, it returns exit code 1.
You can use this result to set up additional checks to enforce a block in your CI/CD pipeline, such as not allowing the merge of the PR/MR. The process to implement a block on a PR or MR after Semgrep exits with error code 1 is dependent on your CI provider. Review your CI provider's documentation for further information.
- Sign in to Semgrep AppSec Platform.
- Navigate to Rules > Policies > Code.
- Filter for the applicable rules. For example, select High under Severities to find all of the rules that generate high severity findings if they match any part of your code.
- Select either the box next to Number matching rules or select individual checkboxes next to one or more rules. These are the rules whose mode you will change in the next step.
- Click Change modes Number and select Block.
Multiple policies
If you have the multiple policies feature, you can customize the rules that run on specific repositories. Currently, this beta is not accepting new participants.
The multiple policies feature enables users to customize the rules that run on specific projects (repositories). Users create different policies that projects can be assigned to.
This feature makes use of a Global Policy that runs on all projects. Projects cannot be unassigned from it.
You can create a new policy and add one or more projects, then select rules to add to the policy. Projects are assigned manually to additional policies, and multiple projects can be added by searching repository names or tags.
During a scan, the repositories assigned to your custom policy run all of the rules from the Global Policy as well as all the rules from your custom policy.
Resolve workflow actions in multiple policies
If a rule is in multiple policies, then the rule is deduplicated and Semgrep prioritizes the workflow action based on the rule mode, where precedence is as follows:
- Block
- Comment
- Monitor
For example, if an instance of Rule A is set to Block, the scan fails for PRs with any findings from that rule, even if the same Rule A is set to Monitor in another policy applied to that repository.
To ensure that the workflow action is resolved as expected, add the specific rule to the desired policy mode. This will override any behavior that it inherits from the rulesets it belongs to.
Not finding what you need in this doc? Ask questions in our Community Slack group, or see Support for other ways to get help.